See what's underneath the hood
All blog posts to date
Introduction
At this point, you have an image of the device. I hope you've patted yourself on the back by now because you have done more in the field of Android forensics than most people ever will.
(If you don't know what a file system is, go ahead and check out this link.)
There are some good free Windows tools for examining an image. Any good forensic tool will allow an examiner to browse around an image file and will not alter the image file in any way. This post will detail FTK Imager by AccessData. So copy your image over to your Windows environment and install FTK Imager. You can find it on this page.
(Note: If you would prefer to work on Linux, you can run FTK Imager Lite in Wine. If you have Windows, I suggest running it natively in Windows instead of in Linux using Wine.)
Open FTK Imager, go to File → add evidence item → image, and open the image. You'll see that the image has opened in Imager, and you'll see all of your partitions. Here's what I see:

And zoomed in on the left side looks like this:

At minimum, you will see the partitions boot, recovery, system, and userdata. Depending on your device, you could see all kinds of other ones. My phone is a Nexus 5, which as you can see above has a lot of partitions.
Expand the “userdata” partition as seen in the following image:
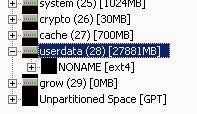
The image above indicates that “userdata” contains an unnamed ext4 file system. Ext4 is a Linux file system, and FTK Imager can read this file system perfectly.
Navigate around the userdata partition. (If by chance you have encrypted userdata, you may or may not be able to make heads or tails of this partition. If you encrypt your userdata and you don't see a file system and want help decrypting, contact me.) You'll see directories at the root of the partition, some of which are quite important. You'll see /data, /app, and you might see /media. /data stores all of the data associated with your installed apps, /app stores all apps you have installed, and if there is a /media, then that is an “internal sd card”, or a directory which acts like an SD card.

Browse around the directory data and find the directory com.android.providers.telephony. This directory stores data associated with your text messages. Within is a directory called databases and file called smsmms.db. That is a database file which stores all of your text messages. Pretty cool, huh? In a future post, I'll show how to open database files. You can export files by right-clicking on a file as seen below.

Navigate around the system partition and go the directory app. This directory stores default installed apps. Just seeing filenames, you'll probably see some familiar names.

With FTK imager, you can navigate around an image. You can also extract files so you can interact with them in another tool. You can also view the hex of an image. Though it is difficult to make sense of hex, it is important to look at files and even device images in hex.

For example, you may have deleted a photograph you took with your camera and cannot recover it (or so you think.) You may be able to find the photograph in the hex. It takes an experienced examiner, or a curious tech mind, to do this. It also helps to have some good forensic tools at your disposal.
Looking at the hex of files allows you to understand the file at a deeper level. A photograph file opens by default in an image viewer, but the image viewer will not display geolocation data or data related to the camera which took the photograph if it is embedded in the file. Viewing the hex of the file may reveal this kind of data.
Previously I mentioned that you can export a file to your computer. Go ahead and export a photograph if you can find one. You may find some in the userdata partition at /media/0/DCIM, which is your camera directory (assuming your userdata partition acts like an SD card, and most modern phones work this way.) Pick out a photograph you've taken and export it to a location on your computer. If you've not installed a Hex editor, go ahead and install a hex editor. I personally use HxD Hex Editor, though there are many other wonderful ones.
Open the photograph you extracted in a hex editor. You'll notice the first few bytes of the image look something like this:

All JPG files begin with this header.
Quick forensics lesson: file headers and footers. The way we traditionally identify a file type is by the extension. We see a .jpg file, it's a picture. We see a .docx file, it's a word document. (It's actually a ZIP file. Seriously, try it out. Rename a .docx file to .zip and open it up.) However, that is not how files actually work. When a .jpg file is encoded and saved, the first few bytes, or the file header, are FF D8 FF as seen above. There are equivalencies with other file types, like ZIP archives, PDF documents, and executables. If you have a nasty piece of malware and rename it with a .docx extension, it may pass under some basic file scanners, but good forensic tools will identify this renamed file as suspicious and indicate that you should check into it. Here is a good writeup on file carving, or putting together files based off of headers and footers.
FTK Imager is a powerful, free tool which allows the user to examine a forensic image. The image of your phone is a file which Windows, Microsoft Office, or any other program you frequently use could not possibly understand, but FTK Imager parses through it perfectly. Android uses the ext4 filesystem, which is a Linux file system that Windows cannot understand, but FTK Imager can parse through it with ease.
FTK Imager, however, is limited. It is not a full forensic tool; it is a tool for understanding filesystems. FTK is AccessData's powerful forensic suite, and it is expensive. It is a wonderful tool that I have used for years, but this is a blog about free tools.
A free alternative to FTK is Autopsy. I will not be covering Autopsy on this post, but I might do a rundown of it in the future. It is a very powerful, free, open source tool with great support. I've had some good luck with Autopsy on Android devices.
Summary
At this point, you have an image of the device. I hope you've patted yourself on the back by now because you have done more in the field of Android forensics than most people ever will.
(If you don't know what a file system is, go ahead and check out this link.)
There are some good free Windows tools for examining an image. Any good forensic tool will allow an examiner to browse around an image file and will not alter the image file in any way. This post will detail FTK Imager by AccessData. So copy your image over to your Windows environment and install FTK Imager. You can find it on this page.
(Note: If you would prefer to work on Linux, you can run FTK Imager Lite in Wine. If you have Windows, I suggest running it natively in Windows instead of in Linux using Wine.)
Open FTK Imager, go to File → add evidence item → image, and open the image. You'll see that the image has opened in Imager, and you'll see all of your partitions. Here's what I see:
And zoomed in on the left side looks like this:
At minimum, you will see the partitions boot, recovery, system, and userdata. Depending on your device, you could see all kinds of other ones. My phone is a Nexus 5, which as you can see above has a lot of partitions.
Expand the “userdata” partition as seen in the following image:
The image above indicates that “userdata” contains an unnamed ext4 file system. Ext4 is a Linux file system, and FTK Imager can read this file system perfectly.
Navigate around the userdata partition. (If by chance you have encrypted userdata, you may or may not be able to make heads or tails of this partition. If you encrypt your userdata and you don't see a file system and want help decrypting, contact me.) You'll see directories at the root of the partition, some of which are quite important. You'll see /data, /app, and you might see /media. /data stores all of the data associated with your installed apps, /app stores all apps you have installed, and if there is a /media, then that is an “internal sd card”, or a directory which acts like an SD card.
Browse around the directory data and find the directory com.android.providers.telephony. This directory stores data associated with your text messages. Within is a directory called databases and file called smsmms.db. That is a database file which stores all of your text messages. Pretty cool, huh? In a future post, I'll show how to open database files. You can export files by right-clicking on a file as seen below.
Navigate around the system partition and go the directory app. This directory stores default installed apps. Just seeing filenames, you'll probably see some familiar names.
With FTK imager, you can navigate around an image. You can also extract files so you can interact with them in another tool. You can also view the hex of an image. Though it is difficult to make sense of hex, it is important to look at files and even device images in hex.
For example, you may have deleted a photograph you took with your camera and cannot recover it (or so you think.) You may be able to find the photograph in the hex. It takes an experienced examiner, or a curious tech mind, to do this. It also helps to have some good forensic tools at your disposal.
Looking at the hex of files allows you to understand the file at a deeper level. A photograph file opens by default in an image viewer, but the image viewer will not display geolocation data or data related to the camera which took the photograph if it is embedded in the file. Viewing the hex of the file may reveal this kind of data.
Previously I mentioned that you can export a file to your computer. Go ahead and export a photograph if you can find one. You may find some in the userdata partition at /media/0/DCIM, which is your camera directory (assuming your userdata partition acts like an SD card, and most modern phones work this way.) Pick out a photograph you've taken and export it to a location on your computer. If you've not installed a Hex editor, go ahead and install a hex editor. I personally use HxD Hex Editor, though there are many other wonderful ones.
Open the photograph you extracted in a hex editor. You'll notice the first few bytes of the image look something like this:
All JPG files begin with this header.
Quick forensics lesson: file headers and footers. The way we traditionally identify a file type is by the extension. We see a .jpg file, it's a picture. We see a .docx file, it's a word document. (It's actually a ZIP file. Seriously, try it out. Rename a .docx file to .zip and open it up.) However, that is not how files actually work. When a .jpg file is encoded and saved, the first few bytes, or the file header, are FF D8 FF as seen above. There are equivalencies with other file types, like ZIP archives, PDF documents, and executables. If you have a nasty piece of malware and rename it with a .docx extension, it may pass under some basic file scanners, but good forensic tools will identify this renamed file as suspicious and indicate that you should check into it. Here is a good writeup on file carving, or putting together files based off of headers and footers.
FTK Imager is a powerful, free tool which allows the user to examine a forensic image. The image of your phone is a file which Windows, Microsoft Office, or any other program you frequently use could not possibly understand, but FTK Imager parses through it perfectly. Android uses the ext4 filesystem, which is a Linux file system that Windows cannot understand, but FTK Imager can parse through it with ease.
FTK Imager, however, is limited. It is not a full forensic tool; it is a tool for understanding filesystems. FTK is AccessData's powerful forensic suite, and it is expensive. It is a wonderful tool that I have used for years, but this is a blog about free tools.
A free alternative to FTK is Autopsy. I will not be covering Autopsy on this post, but I might do a rundown of it in the future. It is a very powerful, free, open source tool with great support. I've had some good luck with Autopsy on Android devices.
Summary
- FTK Imager can allow the examiner to easily take a look at the image
- No forensic tool will alter an image
- Headers and footers, not file extensions, determine the file type
- Viewing files at the hex level allows for a great understanding of the file
I am learning and the way in which you have delivered your knowledge is the easiest & clearest that I have found. I've been everywhere from Google tutorials to 100+ apps & extensions for ruby, json, python, java.... You name it! Thank you for your time!
ReplyDeleteExamining The Image >>>>> Download Now
Delete>>>>> Download Full
Examining The Image >>>>> Download LINK
>>>>> Download Now
Examining The Image >>>>> Download Full
>>>>> Download LINK Ah
Wondering how it works, when there are multiple users on Android? Will each user have separate mount point in userData partition?
ReplyDeleteWell explained, I was really struggling with file examination using forensic tools. Brilliant stuff thank you for taking your time to share this fantastic knowledge
ReplyDelete